Pergola at the Lake Cabin
Many years back, in the summer of 2009, I was asked if I could build a decorative pergola at the family's lake cabin. For better or worse, I agreed to take it on without a second thought.
I had a rough idea of how they were built and what I might want to do, so I fired up SketchUp and created a quick approximation to make sure that the scale and structure were going to look right.

I don't recall the exact dimensions of anything as I'm writing this except that the uprights are 6x6 posts. I believe the doubled beams are 2x8s and the rafters running perpendicular are 2x6s. All of the lumber used was treated.
Once I finalized the design and dimensions, I was ready to get to work. At the time of building the pergola, I lived over an hour's drive from the cabin, so I had set myself the goal of completing the entire project over two adjacent weekends.
On the first weekend, I used stakes and string to lay out the site and located where my footings were going to be placed. I dug the holes as close to two feet deep as I could manage and roughly 1 foot in diameter. I knew that I was going to use metal anchors at the base of the posts, but I didn't yet know exactly which style of anchor I was going to use. Because of this, after mixing and pouring the concrete, I ended up just smoothing the tops of my footings roughly flat.
Coming back a week later, I brought all of the tools and materials I though I would need. I started by centering of all of my posts on their respective footings, then drilling a hole with a masonry bit to accept expansion style anchor bolts. I used the bolts to attach galvanized standoff post anchors.
-
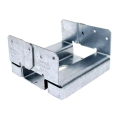 An example of the anchors used.
 -
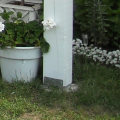 The anchors in place.


Before raising the huge posts, I located where the carriage bolts for the 2x8 beams should pass through the posts and drilled those holes. I also notched the bottom corners of my beams at a 45 degree angle for a clean and simple look.
I then used some spare wood as bracing to help me hold the posts plumb while I attached them to the anchors. Once they were all standing, I was able to add the long beams and bolt them together into standing pairs. I had pre-drilled all of the holes, but they were still a little tight and pounding the eight galvanized carriage bolts through all of that material while they were overhead was exhausting!
-
 A pair of carriage bolts attach the beams to each post.
 -
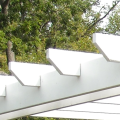 A simple 45 degree angle was cut into the end of the rafters.


The last thing to do before slapping on a coat of paint was to get the rafters attached. These also got a 45 degree notch on the bottom, and then additionally they all need to be notched to fit over top of the beams as well. Each rafter has 4 notches, half of their depth, to allow them to fit over the beams. They are then secured using 4" screws from the top into the beams.

And that's really all there was to it. It's certainly not the best or only way to do it - in fact I wouldn't recommend that anyone else do it exactly this way! If I were to make any changes, I think I would look into adding bracing between the vertical posts and the horizontal beams to help stiffen the whole structure.